Introducing This Way or That

During the Thanksgiving weekend of 2016, I released a new interactive fiction website: This Way or That.

If you follow me on Twitter, you know that I’ve already released two interactive fiction websites:

These two sites were very similar in that they allow you to write interactive fiction using a simple syntax language made up of braces. You could create branches in your story easily and even go so far as to make use of variables and conditional statements to change what the reader would see based on various decisions they had made in the story.

The downside to the above sites was that they require a singular author to write the story. Most people aren’t authors, and a fun site to create interactive fiction doesn’t work if there are no contributors.

Interestingly, whenever I described the above sites to people, they would assume that my site allowed you to write interactive fiction with other people, in a sort of exquisite corpse way. That is, you’d write one paragraph, then someone else would come along and write the second, then a third person would write the third, and so on. That’s not what those sites allowed you to do at all, but it got me thinking…

Well, after a little bit of work of forking the Diorama Club II site, I came up with This Way or That. It allows you to write a part of a story and let someone else write the next part. (Mind you, Diorama Club was the first site I’d ever written in Node.js, so it took extra effort to write. Plus, I was new to Javascript programming! I had much more experience in C, C++, and Objective-C.)

This Way or That makes use of some simple rules to help move the story along. For instance, as the author of a page, you can write the title (or titles, if you want to allow the user to make decisions, like a Choose Your Own Adventure book) for the next part of the story. Now when someone else comes along, they can click on the title of the next section and based on the title you wrote, they can be inspired and write that part of the story.

You can also keep your part of the story open so that other people can come along and write any arbitrary sections with arbitrary titles.

So far, I’ve had a challenge of finding users for this site. Most of the people who view the site, I believe, probably get how the site works, but they aren’t inspired to write anything. Let’s be honest, most people aren’t very creative, and are probably a little bit hesitant to start becoming creative on a strange website.

I have some ideas to help make the site more fun and engaging and spur people’s creativity, but I’ll wait a bit to see if more people bite. One of the ideas is to have random words pop up for each part of the story that you are forced to incorporate. This would hopefully have the effect of giving people a challenge and ideally cause them to start writing. Another idea is to simplify things a bit of have a Madlibs style form that you’d fill in with details that would complete the story.

In any case, as with most projects, it takes time and effort to try different things, so for now I’m going to leave the site in its current state and try to promote it some more before going wacky with my ideas.

If you think the idea for the site is a good one, please do promote it!

In closing, go and check out This Way or That.
Little Phrase Book v1 for Mac released

About a week ago, I released Little Phrase Book for macOS to the Mac App Store.

If you’re learning a new language and want a way to keep track of all the foreign phrases you’re learning, try out Little Phrase Book. You can easily search existing phrases by typing in the search field and seeing results displayed right away. It also has a built-in flash card feature so that you can review all of your phrases and commit them to memory over time.

Download Little Phrase Book today from the Mac App Store.

I’m quite proud of this release because unlike a lot of projects I’ve worked on in the past, I released this one as soon as it was good enough. Essentially, I had in mind a sort of minimum viable product in mind, and when it got to that stage, I cleaned up the UI, fixed as many bugs that prevented the golden scenarios from working, and then sent it off to Apple to review.

In all, it took less than a month to go from the first commit to it appearing in the store. With that in mind, I also didn’t work on it nearly that much. In total number of hours, I’d guess I spent maybe 20 hours working on this app before shipping.

I have more plans ahead for it, but it was important to get the basic features working so that I could dogfood it daily to see what worked and what didn’t. I added a very early flash card implementation. It’s quite naïve at the moment, but it’ll be full-featured in the future. I plan on implementing a spaced-repetition algorithm so that you can truly use this app daily to memorize things.

Another thing I’ve noticed is that the app is actually quite useful for just storing general notes that you need to recall occasionally. For instance, there are some command-line tools at work that I need to use, but their syntax is a little cryptic and hard to remember. I just created a phrase book for commands and whenever I need to “recall” the cryptic command, I just type in the search term and it immediately appears. This is much faster than putting things in a notebook or text file and having to do a cmd-F to find the entry.

lil todo v2 update

I posted a few months ago about updating lil todo, my Windows Phone to-do app. Since then, I’ve done a lot of work and want to share some updates.

First of all, I had mentioned half-jokingly that I would write a command-line version of the app. Guess what? It happened. I wrote a Ruby implementation of the entire app model first. With the Ruby script, I was able to get something a simple app with a new data store system working in a day! A few days later I was able to get a simple prototype of a cloud-syncing solution working.

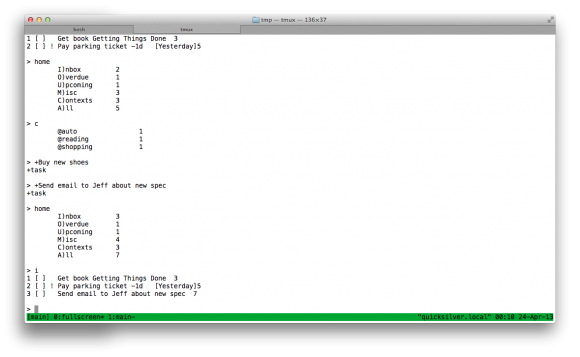
A simple menu system is used to navigate all your tasks. You type in a command like “inbox” to see all your items in the inbox. To see all your tasks, type “all”. To add a task, you’d type + followed by the name of the new task. There’s a bit of a learning curve at first, but once you get it, it’s pretty quick to navigate the system:
Screen Shot 2013-04-24 at 12.10.19 AM

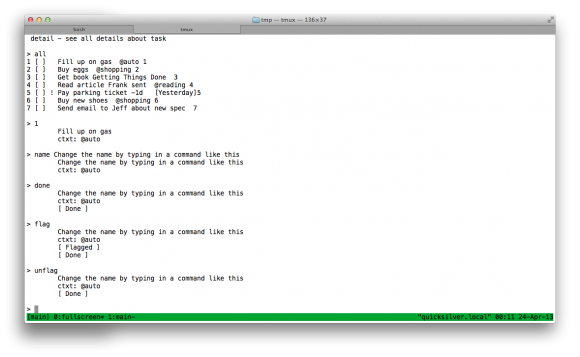
To edit a task, enter its number and then type in a property name followed by the new property value:
Screen Shot 2013-04-24 at 12.11.05 AM

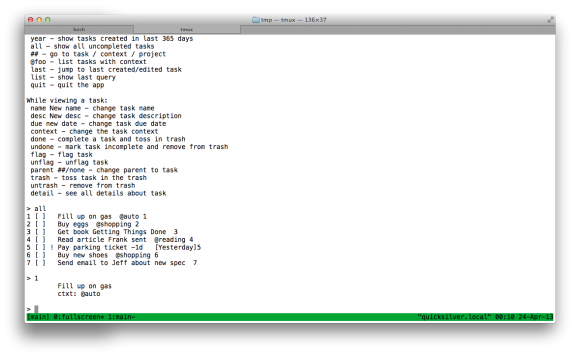
Of course, there is a built-in help system. 🙂
Screen Shot 2013-04-24 at 12.10.35 AM

There’s more to share, but I’ll cover that in the next post. As a preview, the new version already supports syncing to a Dropbox account, so you will be able to edit tasks on your mobile device and on a desktop app!