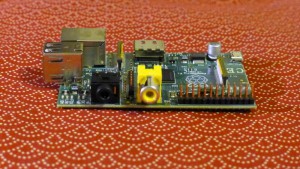
Debugging Raspberry Pi power issues

I recently tried out Plan 9 for the Raspberry Pi. I tried it for all of 5 minutes and got bored and left my RaspPi plugged in. When I came back a couple of hours later, the Pi was powered off with no LEDs turned on. What’s more, it smelled like something was burning and the board seemed a little hot.

I unplugged the thing and plugged it back in, but it wouldn’t boot up. None of the LEDs would light up.

This was a learning opportunity, so I decided to debug it. There is a lot of good info online for debugging power issues on the Raspberry Pi.

Apparently, there is a fuse next to the USB power input that could possibly open up if too much current flows into the Pi. Since I was doing the non-recommended thing and powering my Pi with the USB port of my PC, I figured maybe that was it. I measured the voltage across the fuse (known as component F3 on the board) and found 4.3V in and 3.9V out. That’s a significant drop.

According to this page, if you have a significant drop in voltage across the fuse, it’s likely open (or blown). The fuse auto-resets itself, but just needs some time, so one option is to leave the device powered down for a few hours, or days, and see if it works then.

In my case, I left it for a few days and it still wouldn’t work, so I figured the fuse must be blown. However, I figured the input voltage of 4.3V was itself too low, so I tried ordering a new USB power source. From watching a terrible video on YouTube (I won’t link it), I found out that Adafruit provide a nice little power source. They also provide micro USB cables, so I figured maybe I should get another one and see if that helps.

Today, I tried out the new power source and USB cable. I now read 4.7V in on the fuse and 4.38V out. The board still won’t power up. There’s still quite a drop, so I really think the fuse is bad.

Next up: try removing the fuse and shorting the line. I’m no expert on this, but I’ve read that this is really not recommended since the fuse really does serve a purpose of ensuring you don’t supply an overcurrent. I’m going to trust my power supply is a good one and experiment.

Long term, I’d still like to get a new fuse. Unfortunately, I visited a couple of local shops in the Seattle area and they didn’t have any of the surface-mounted resettable fuses, so I’ll have to order one online and wait for a few days.

I wrote an ANSI interpreter

Just for fun, I wrote an ANSI interpreter. It was surprisingly easy.

ANSI was hugely popular in the late 80s and then the 90s when BBSes were popular. They were an encoding system that allowed text to be displayed in different colors. ANSI escape codes generally take the form of ESC[{params}{char} where ESC is the escape character, \x1B, {params} is an optional list of numbers, delimited by semi-colons, and being the last part of the sequence, {char} dictates what formatting to apply, such as changing text color, enabling bold, or even moving the cursor around the screen.

Writing the interpreter was simple. I just needed to create a state machine whose state changes whenever a new character is read in from the ANSI file. The interpreter reads in characters and prints them out as it goes along. However, when it encounters an escape character, 0x1B, it goes into a state where it’s looking for ‘[‘, and if that succeeds, it goes into a “looking for parameters” state, and finally a “looking for the {char}” state. Once it gets that last char, it tells “executes” the command.

Go ahead and take a look at the source on bitbucket. It’s called Pansi. 😉

Here’s a video demonstrating it in action. I’ve hooked it up to a simple text renderer engine. However, my text renderer is using a free 8×8 bitmap font that does not have support for extended ASCII characters, and so I’ve had to cheat and just treat all those high-bit ASCII characters as 8×8 blocks. Hence, the artwork doesn’t look quite right. If you like the artwork in the demo and want to see them in full, download them at ACiD’s site.

Upgraded WordPress to 3.4.1 and now Upload/Insert image (media-upload link) doesn’t work!

This was driving me crazy. I upgraded to 3.4.1 of WordPress and now when I create blog posts, I can’t insert images!

I figured it out. If you have this problem, try deactivating your WordPress plugins until you find the one at fault. In my case, the Disqus plugin was causing issues. There are more tips on fixing this issue at the WordPress support page.

Getting started with Raspberry Pi

I’m just going to blog a bit about my experience with Raspberry Pi.

What is it?

First off, if you don’t know what it is, Raspberry Pi is a cheap, tiny computer. It’s sold for $25/$35. It was originally developed for educational purposes, but due to its low price it has become sought after by hackers.

It’s about the size of a credit card and can be plugged into a regular TV. Instead of a hard drive or flash drive, it uses an SD card for its storage. It has two USB ports so that you can plug in a keyboard and a mouse.

It has only been generally available to the public since March 2012 and I finally got mine in the mail yesterday. Technically, it was delivered by DHL, which is a cheap delivery company. DHL is so cheap that if you’re not home when they deliver, they will send your package back to the sender. You have to be home, otherwise after a few attempts they will give the package back to the sender. They don’t have a public-facing location that you can just drive to like FedEx and UPS, so be warned.

Getting everything ready

Anyway, I had everything I needed to use my Raspberry Pi, so I started by reading the Quick Start Guide. After getting all your keyboard, mouse, SD card, and cables ready, you will need to download the OS image here: http://www.raspberrypi.org/downloads I used a torrent, verified the download sha-1 hash and then followed the instructions on this page to write it out to a blank SD card.

Raspberry Pi is powered via micro USB connector. This is similar to what a lot of modern cameras and cell phones might use. The Raspberry Pi page says specifically not to plug in the device into a PC, but after doing some research online, a lot of people had good results, so I chanced it. I had a micro USB cable from my Samsung Focus phone, so I used that.

The moment of truth

I plugged in the SD card, the keyboard, mouse, and then composite out into my TV. After that, I plugged the USB cable into my PC for power, and lo and behold it started booting up… And then–kernel panic. Apparently, I need to update my firmware. So now I’m off to download another copy of Debian Linux from here: http://www.raspberrypi.org/archives/1435. Hopefully this one works.